Cash Rocket Admin Panel
Cash Rocket App
Getting Started
Cash Racket – Flutter Earning App with Admin Panel
- Uploaded Date: 24-Nov-2023
- Project: Cash Rocket
- Author: Acnoo
- Email: acnooteam@gmail.com
Thank you for purchasing our product. If you have any questions that are beyond the scope of this documentation file, please feel free to email us via our user page contact form or directly to email at acnooteam@gmail.com
Requirements
- PHP >= 8.1
- Ctype PHP Extension
- cURL PHP Extension
- DOM PHP Extension
- Fileinfo PHP Extension
- Filter PHP Extension
- Hash PHP Extension
- Mbstring PHP Extension
- OpenSSL PHP Extension
- PCRE PHP Extension
- PDO PHP Extension
- Session PHP Extension
- Tokenizer PHP Extension
- XML PHP Extension
For more information about deployment see the Laravel documentation here https://laravel.com/docs/9.x/deployment
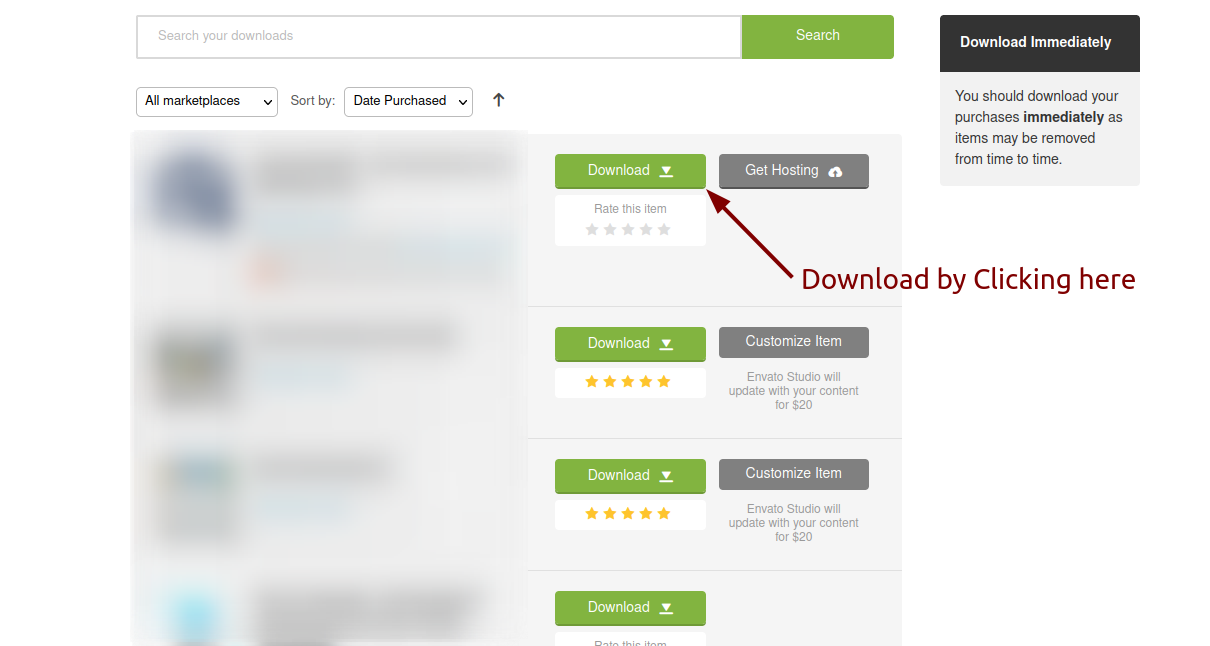
Download Project from Envato
After successfully purchase Cash Rocket download the project from Envato download page
Extract the downloaded file. You will have another zip file named cashrocket.zip containing the main project's files and a documentation folder. You are reading this documentation, that means you already have theme both.
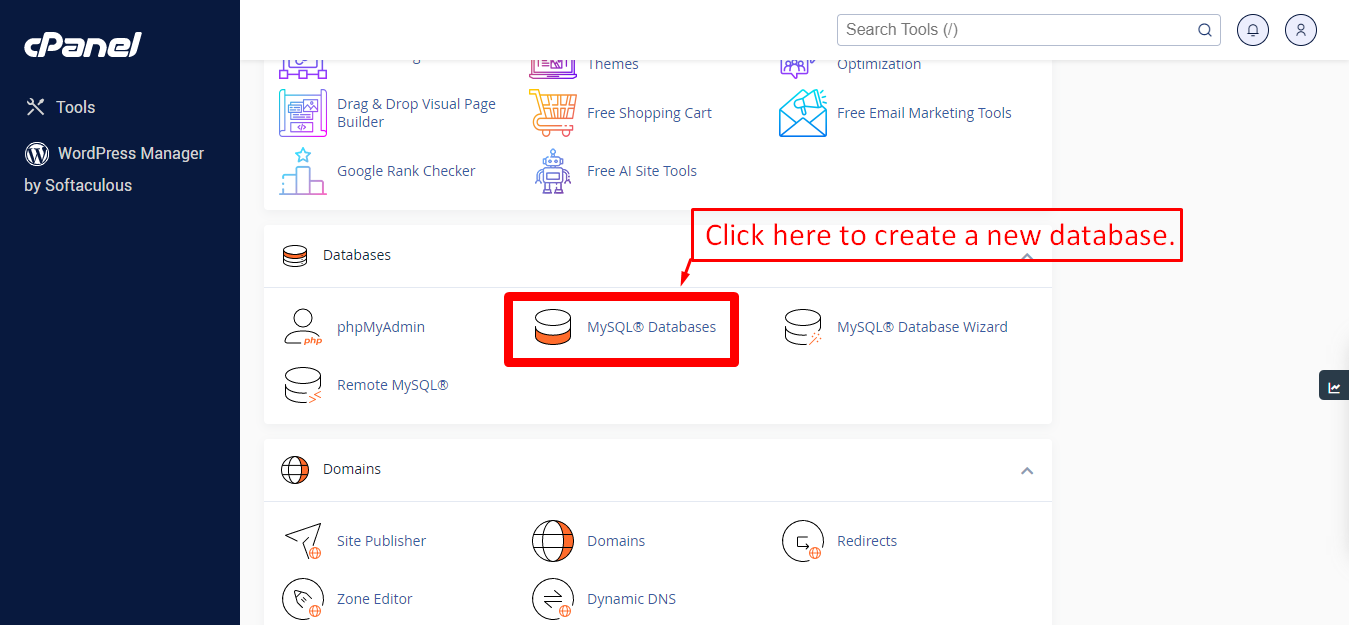
Creating Database
Before installing, you will need to create a new database. If you already know how to do this or have already created one, skip to the next step.
Note: Please use empty database. In most cases you should be able to create a database from your cpanel.
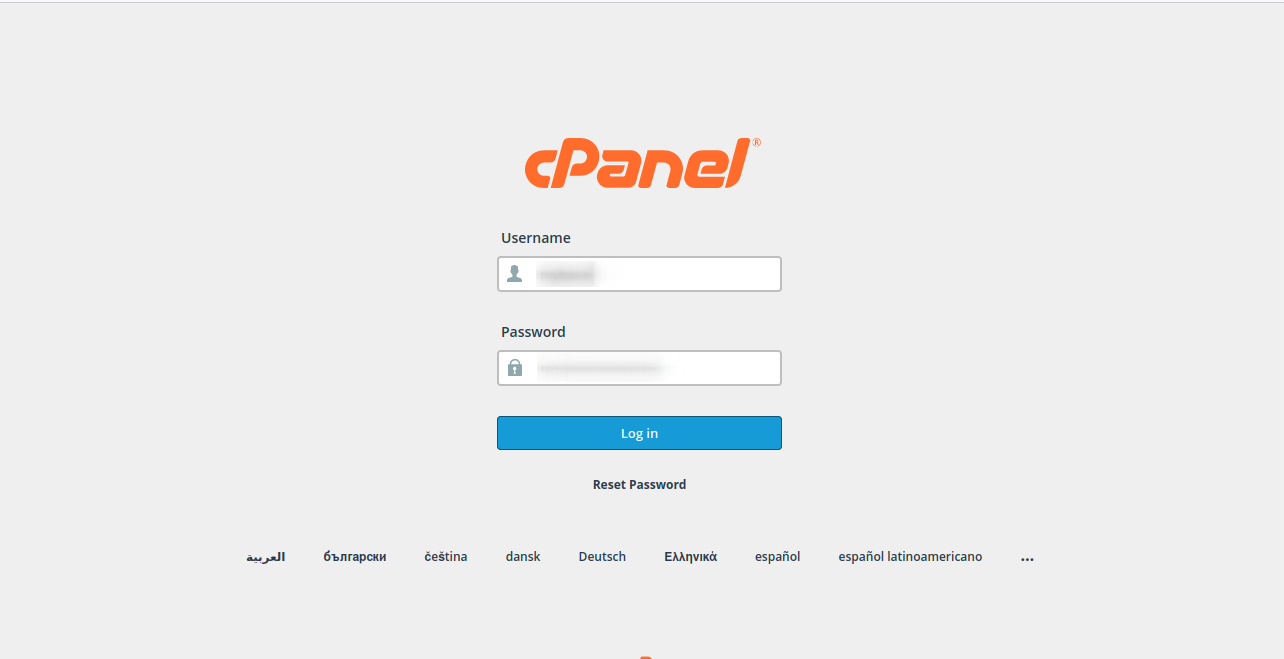
Login to your cPanel by entering this in your browser url
yourdomian.com/cpanel
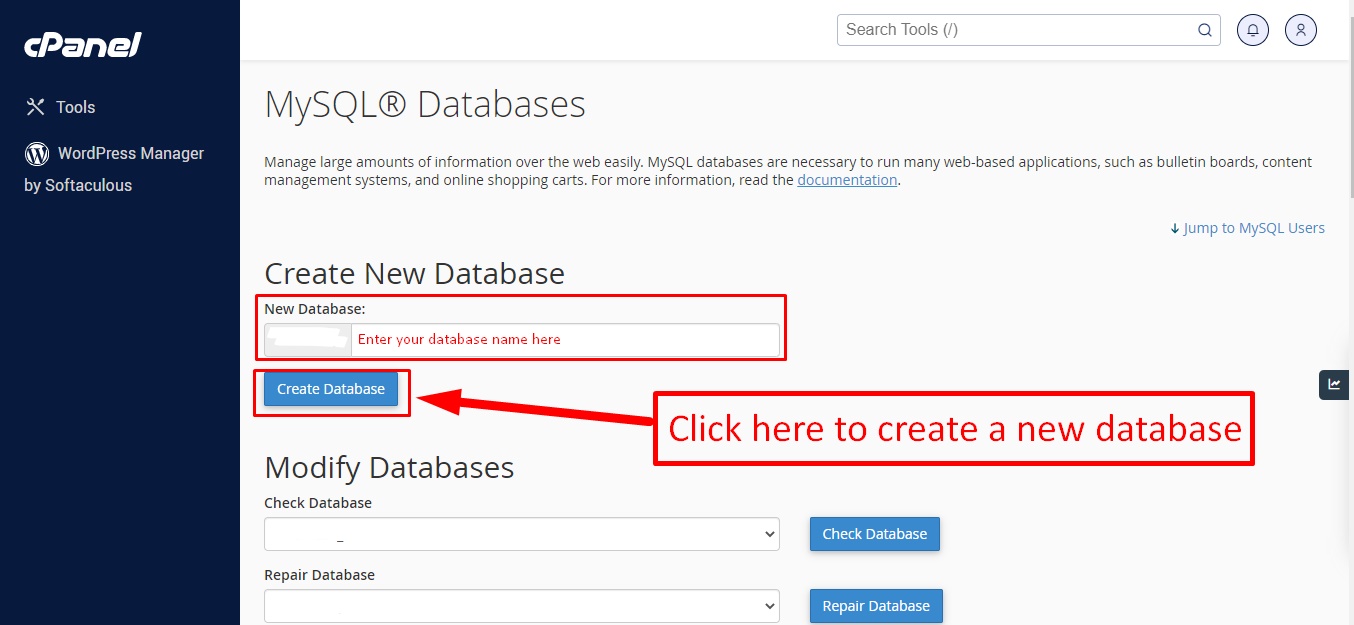
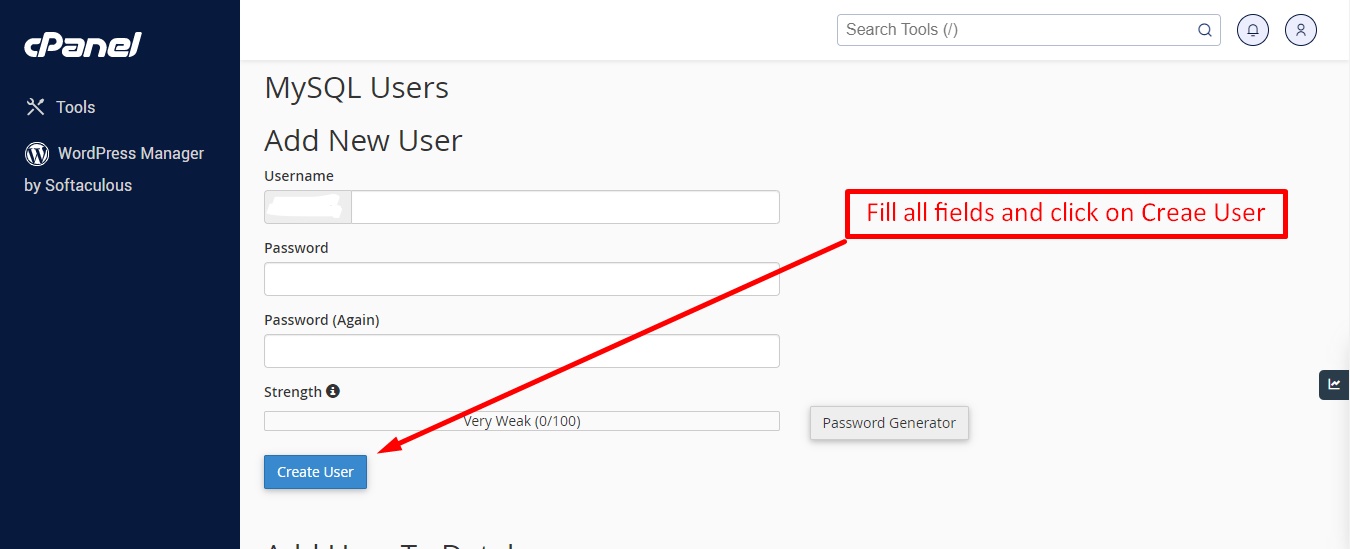
Step: 1
Step: 2
Step: 3
Now you need to create a new user. On the same page go to create a new database user
Step: 4
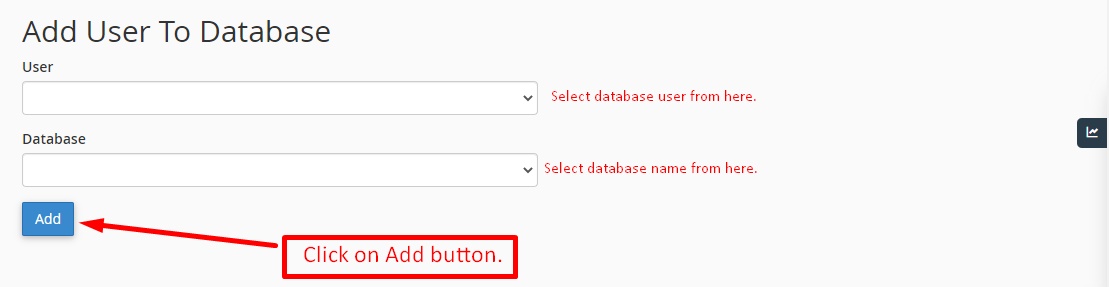
Now add the user to the database
Step: 5
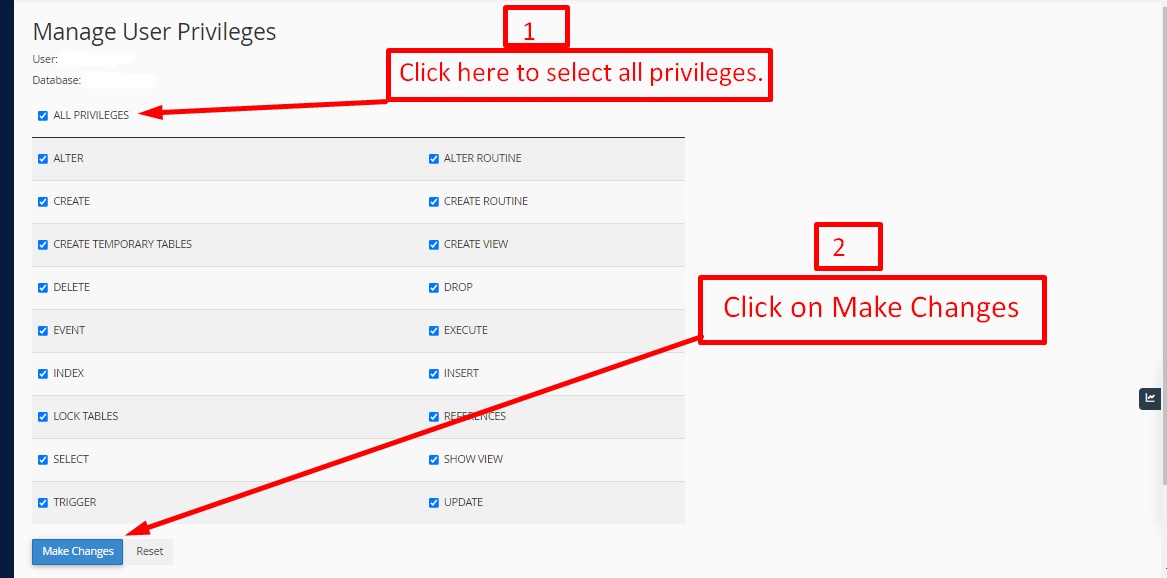
And select full permissions on the database to that user
Uploading Files
On some operating systems, the dotfiles are hidden by default. Before starting to upload the files, please make sure your file explorer has the option to view hidden files turned on.
After creating a database, Upload the cashrocket.zip file on the web root folder of your domain. This folder is generally called public_html, html, or example.com, but depending on your server's configuration, it might be named differently.
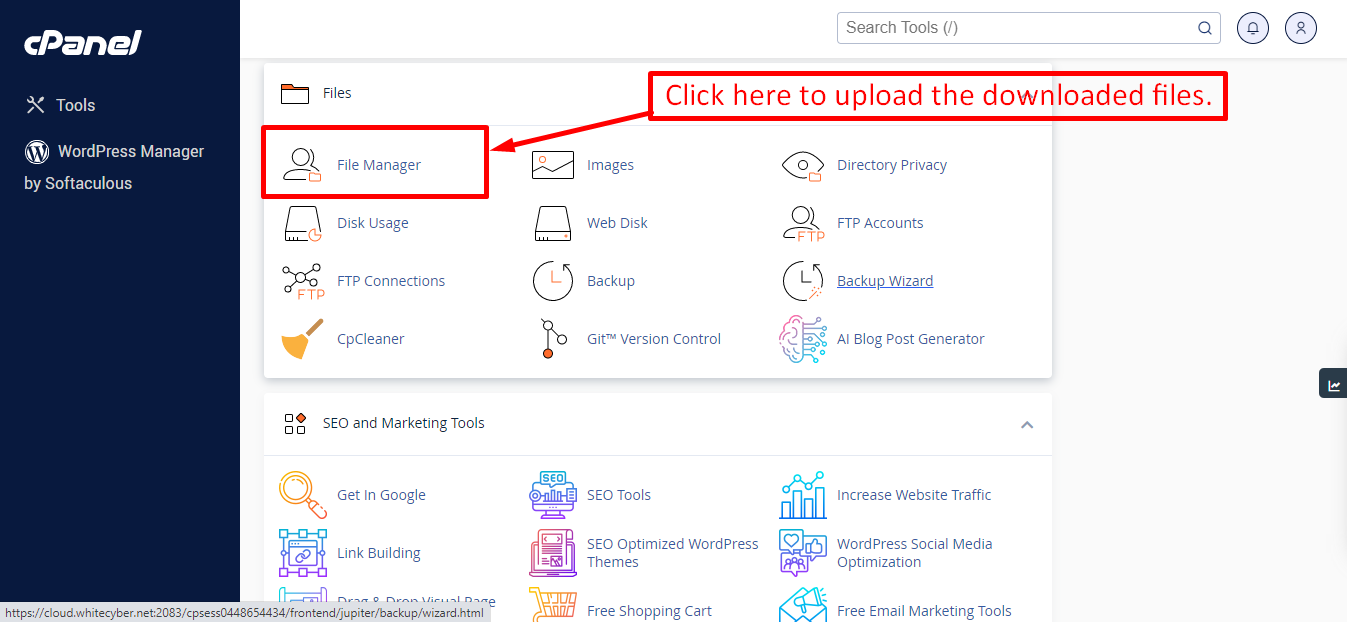
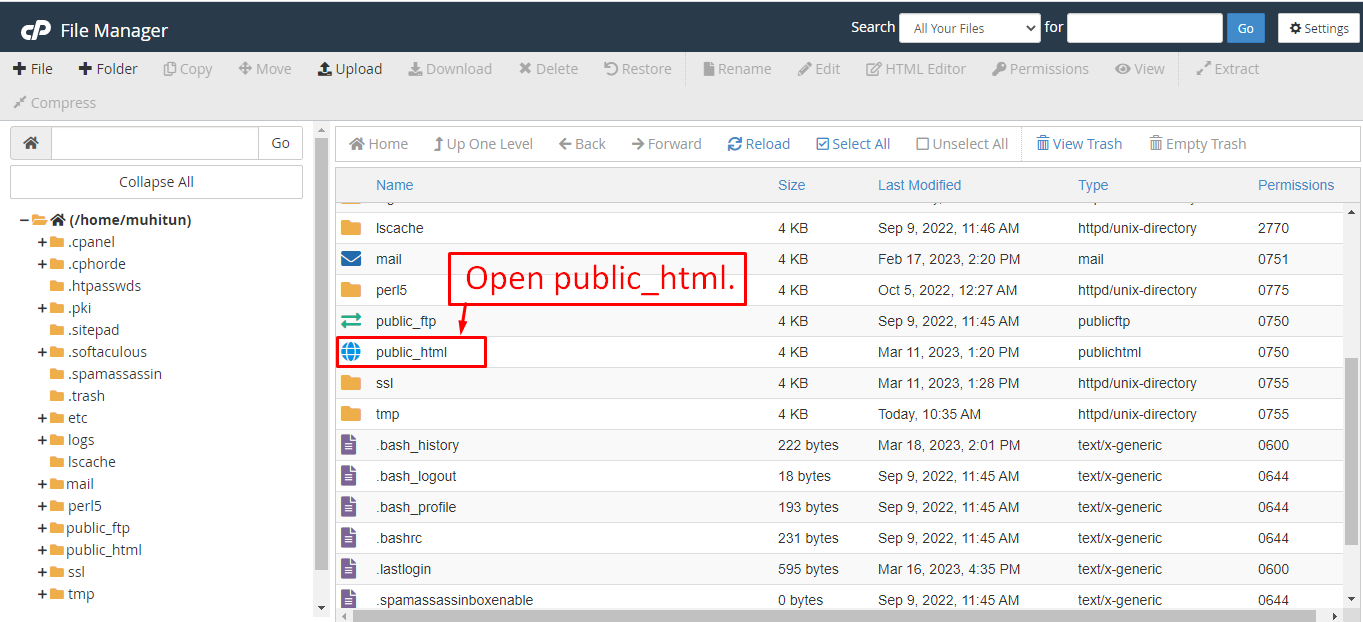
After that in the public_html directory upload the downloaded file.
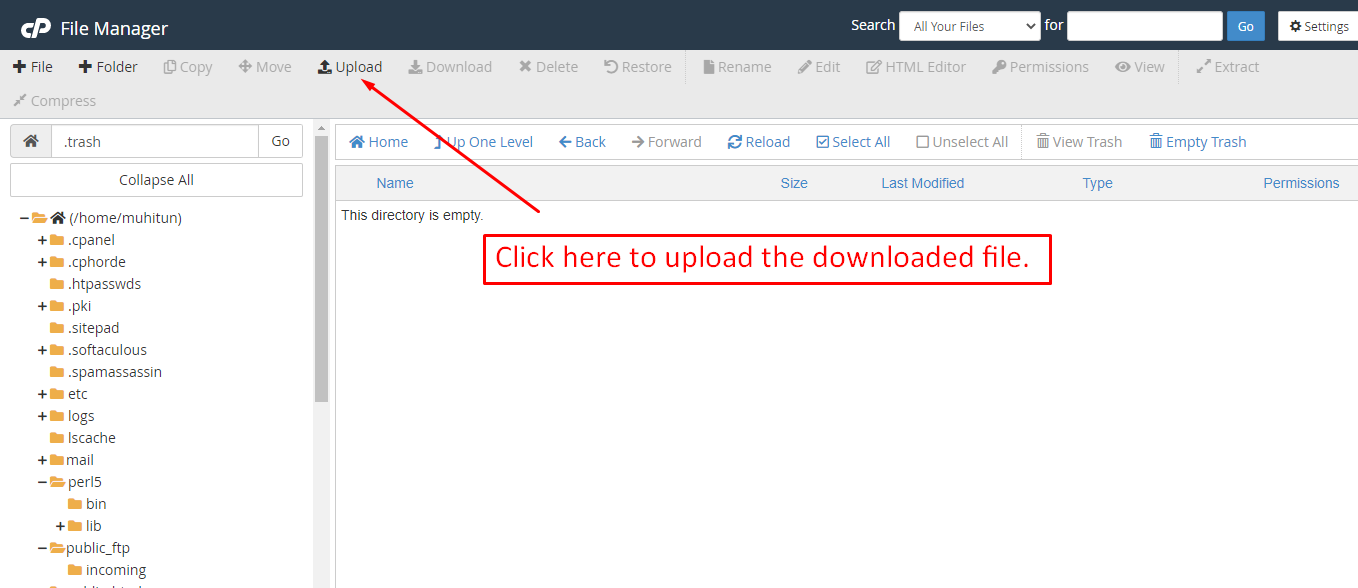
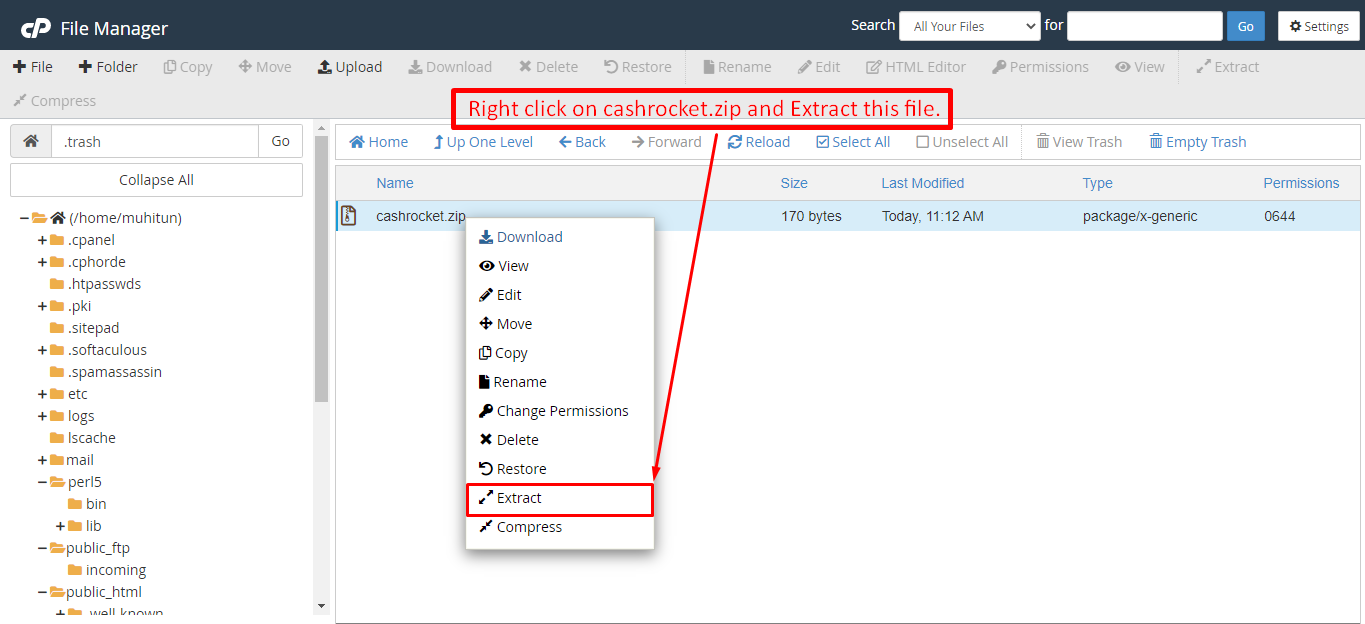
Now extract the cashrocket.zip file inside the root folder.

Note: Important Make sure that you have .env file in your folder.
Note: Make sure that .htaccess file got copied properly from the download to your server.
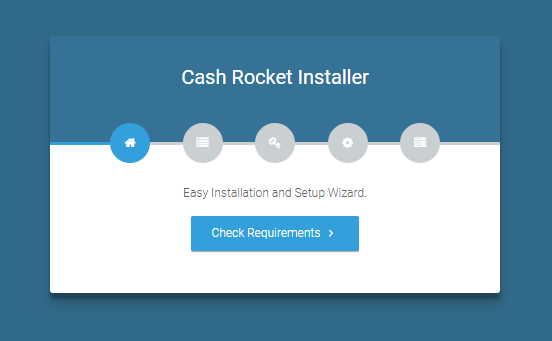
Installation Wizard
Go to your website address, then you'll see an installation wizard. To open the installer. Visit
yourdomain.com/install
Now the installer will show up.The First screen will be Welcome Screen
Note : If you are not able to access the website by accessing yourdomain.com/install, but you are able to access it via yourdomain.com/index.php/install, this means that you probably don't have Apache mod_rewrite installed and enabled.
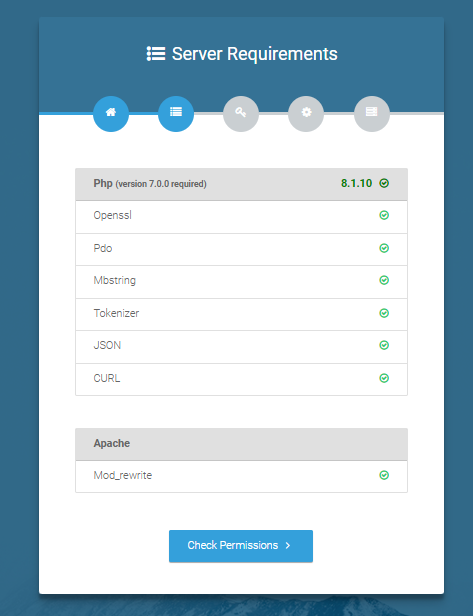
Server Requirements
After clicking on "Check requirement" button, you will be redirected to System Requirements step during the installation wizard, System Requirements.
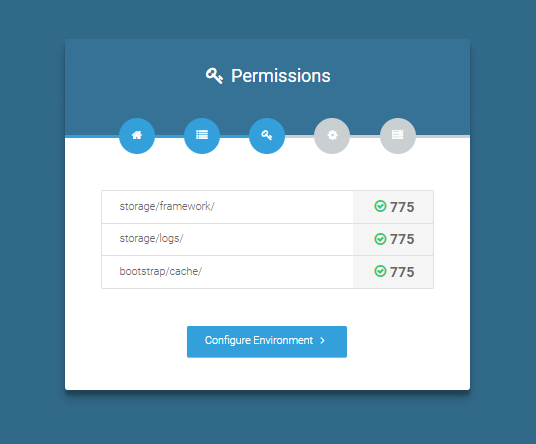
Directory Permissions
After successfully enabling and installing all required PHP extensions, next step is to set the appropriate permissions for some system folders that shows on below picture.
For giving permissions please open your terminal window. and type command sudo chmod
777 directory_name for example sudo chmod 777 app
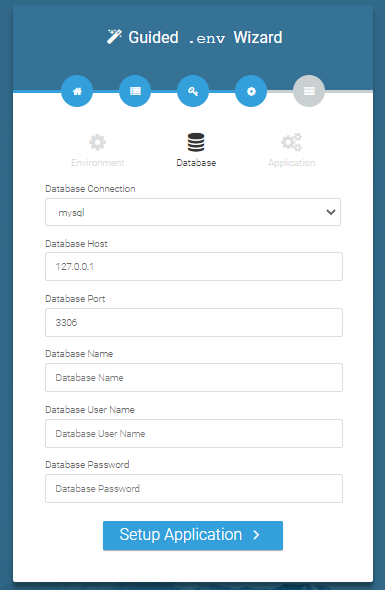
Database/Environment Setting
You have to fill in your database credentials

Exit
The last step is exit step.
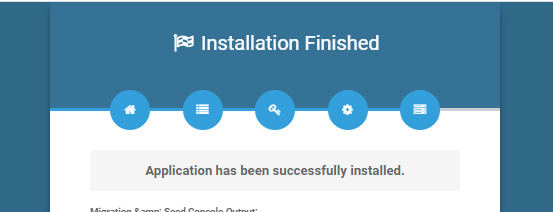
Congratulations you have successfully installed this project on your server. 😀
Default Password
Now You are ready to login with below detail.
Admin login credentials
Admin Change Logs & Update Guide
Note: Before updating to the new version, please ensure you have a database and full project backup, and that your project is already updated to the latest version. This is extremely important!
Version: 6.5 (4 November 2025)
- Added point purchase module.
- Fixed youtube player issue in video module and tutorial.
- 10+ Payment gateway added.
- Added point purchase module.
- Fixed youtube player issue in video module and tutorial.
- 10+ Payment gateway added.
Note: Please replace the following folders:
✔ app
✔ public → assets
( No need to replace the entire public folder; just update assets folder inside it )
✔ resources
✔ routes
✔ database
After replacing them, visit yourdomain.com/migrate to install the new version and
please don't forget to reload hard your browser. Without visiting the URL and reloading
hard, your project will not function correctly, so ensure you complete this step.
Note: If you face any issues with the update, please contact us.
Version: 6.4 (15 September 2025)
- Add more languages and fixed language bug issue.
- Currency issue fixed.
- Flutter version updated to 3.35.3.
- Code optimized.
Version: 6.3 (25 August 2025)
- Flutter version updated to 3.35.1.
- Code optimized.
Version: 6.2 (03 July 2025)
- Detect VPN and block VPN users from using the app.
- Detect root devices and prevent users from using the app on rooted devices.
- Detect emulators and prevent users from using the app in emulators.
- Flutter version updated to 3.32.5.
- iOS issue fixed.
Version: 6.1 (02 June 2025)
- Flutter version updated to 3.32.
- Performance improved.
Version: 6.0 (18 February 2025)
- Installer permission issues fixed.
- Some codes removed and added for installer.
- Updated Flutter version 3.29.
Version: 5.9 (18 December 2024)
- Updated to latest Flutter Gradle settings and Gradle versions.
- Compatible with Ladybug.
- Updated Java version.
Version: 5.8 (17 November 2024)
- Flutter version updated to 3.24.5.
- Performance improved.
Version: 5.7 (29 September 2024)
- Flutter version updated.
- Performance improved.
Version: 5.6 (13 September 2024)
- Video blank issue fixed.
- Performance improved.
Version: 5.5 (09 September 2024)
- Flutter version updated to 3.24.
- iOS bug fixed.
- Performance improved.
Version: 5.4 (23 August 2024)
- Added purchase code verification.
- Performance improved.
Version: 5.3 (07 August 2024)
- App Flutter version updated.
- Code improved.
Version: 5.2 (07 July 2024)
- Fixed login redirect issues based on user roles.
- Fixed redirect issue when the login session was destroyed.
Note: Replace the following folders: app, resources, and routes.
Version: 5.1 (03 July 2024)
- Mobile number OTP issue fixed.
- Google login issue fixed.
- Minor bugs fixed.
Version: 5.0 (30 March 2024)
- Admin panel installation issue fixed.
- Minor bugs fixed.
Version: 4.1 (27 March 2024)
- App video section made dynamic from admin panel.
- Flutter version updated to 3.19.4.
- Minor bugs fixed.
Version: 4.0 (02 February 2024)
- App theme color updated.
- Flutter version updated.
- Minor bugs fixed.
- Admin profile update issue fixed.
- Users profile update issue fixed.
- Users sign-up & sign-in issue fixed.
Note: Replace app & resources folders.
Version: 3.2 (11 December 2023)
- Fixed pagination issue.
- Code optimization for better performance.
- Flutter version updated.
Note: Replace app and resources folders.
Version: 3.1 (25 November 2023)
- Fixed all data type issues.
- Improved UI.
Note: Replace app, database, and resources folders.
Version: 3.0 (28 October 2023)
- Website visit and earn (New).
- Scratch card and earn (New).
- Pollfish, Inbrain, and Bitlabs surveys (New).
- Custom video view and earn (New).
- Google and phone login using Firebase (New).
Version: 2.4 (11 September 2023)
- iOS issue fixed.
- Flutter version updated.
- Minor bugs fixed.
Version: 2.3 (14 June 2023)
- Fixed withdraw approval issue.
- Fixed spin wheel design issue.
- Fixed minor bugs.
Version: 2.2 (12 June 2023)
- Fixed quiz issue.
- Fixed withdraw issue.
- Fixed admin panel issue.
- Fixed app withdraw issue.
- Fixed minor bugs.
Version: 2.1 (03 June 2023)
- Fixed some minor issues.
- Improved code structure.
- Fixed seeder issues.
- Fixed app withdraw issue.
- Fixed quiz issue.
- Minor bugs fixed.
Version: 2.0 (29 May 2023)
- Fixed admin panel filesystem issue.
- Added 46 new multi-languages.
- Improved code structure.
- Flutter version updated.
- Minor bugs fixed.
Version: 1.3 (20 May 2023)
- Fixed admin panel issues.
- Security improved.
- Improved code structure.
- Flutter version updated.
- Minor bugs fixed.
Version: 1.2 (14 April 2023)
- Fixed database issues.
- Removed seeder data.
- Fixed auto permissions exception problem.
Version: 1.1 (14 April 2023)
- Trial issue fixed.
- Share icon issue fixed.
- Performance improvement.
- Minor bugs fixed.
Version: 1.0.0 (Initial Release)
- Initial release.
Flutter App Installation Setup Start
Tools & Setup
Account Needed
- Admob: https://admob.google.com/home/
- StartApp: https://www.start.io/
- Applovin: https://www.applovin.com/
- Audience: https://www.facebook.com/audiencenetwork/
- Offertoro: https://torox.io/
- Pollfish: https://www.pollfish.com/
- Bitlabs: https://bitlabs.ai/
- Inbrain: https://www.inbrain.ai/
Note : You need to have an active account from all the portals above. Account approval is not part of the purchase.
After signing up at the portals above, you need to add your app info and app package name in most of the portals. App package name is not required for all portals. Some of the portals will not approve your account until you upload it to the play store and have at least 1 thousand installs. After adding your app, you will get an id or api keys that you will save at the admin panel.
Login to admin panel > Settings > AdNetworks
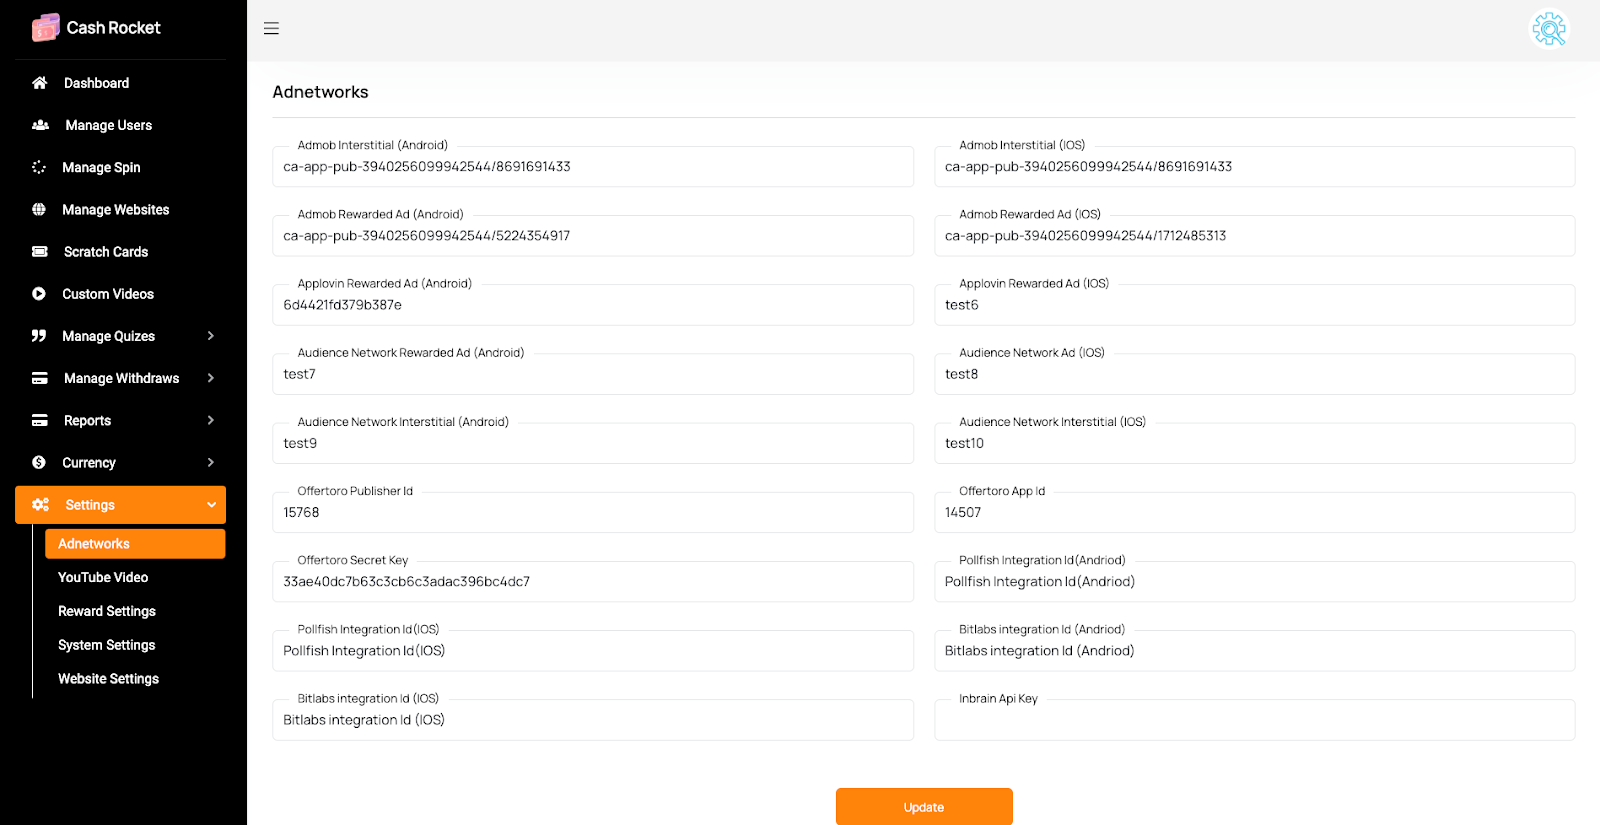
For offertoro: For offertoro to work, you need publisher id, app id and secret key. Here how you will get them after signing in to the portal:
pubid: can be found in your Torox account under the Account Tab. Look for Publisher Id (pubid)
appid: (the id of your App Placement), and secretkey can be found by going to 'App Placement' in your Torox account, then by clicking on the app placement you want to pull the feed for. Its Mandatory that you create an App Placement before you can access the API. in your
secretkey: is also known as App Key.
Note: Each App Placement you create, gets a separated API feed, with different appid, and different Secretkey (App Key)
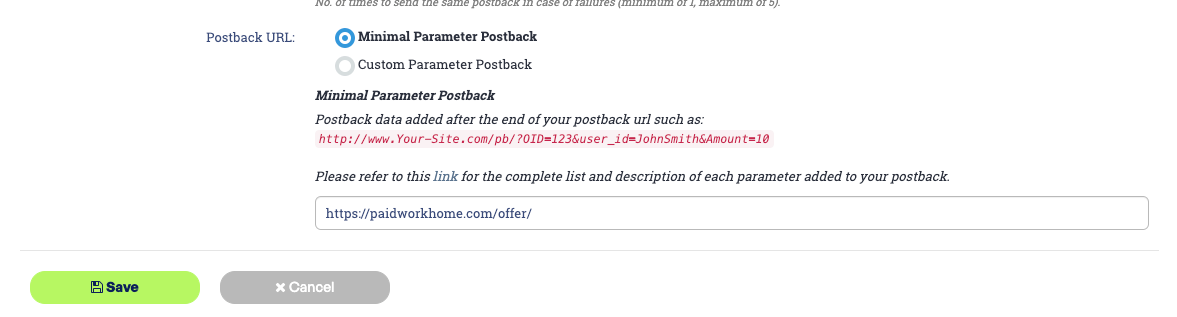
Callback Url: The global postback URL you need to define in your Torox's App Placement section. Your callback url is:
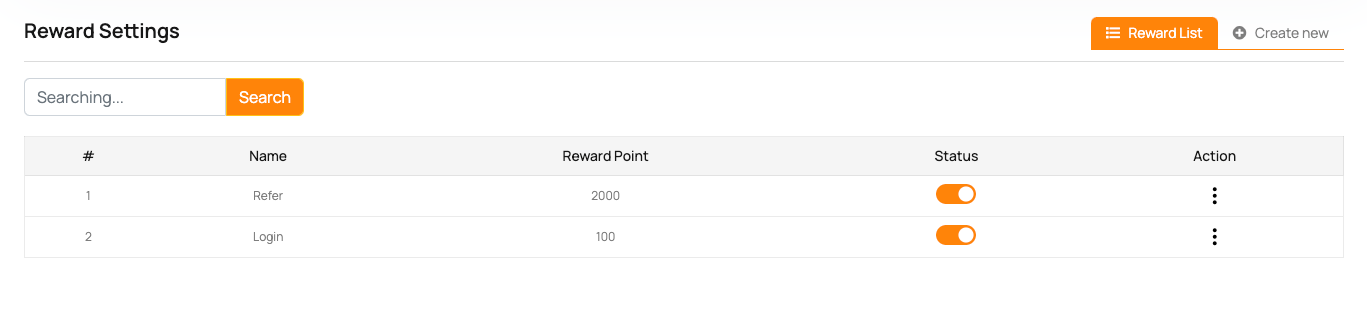
Update Reward Settings: Login to admin panel > Settings > Reward Settings
Changes Needed in code
N.B: Follow the admin panel installation tutorial.
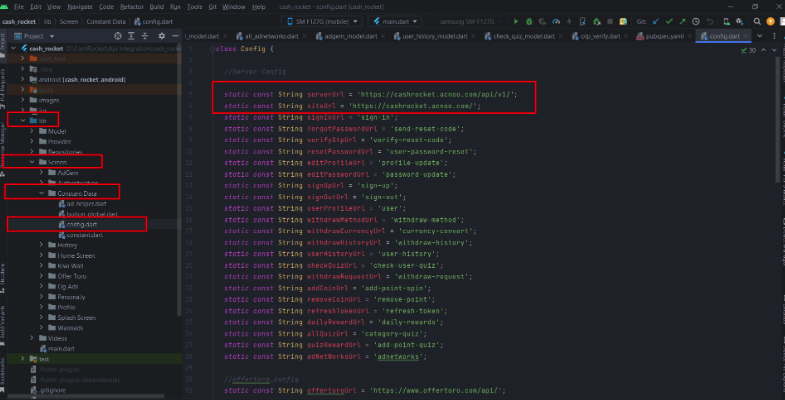
Change Admin Panel URL: Go to lib > Screen > Content Data > config.dart.

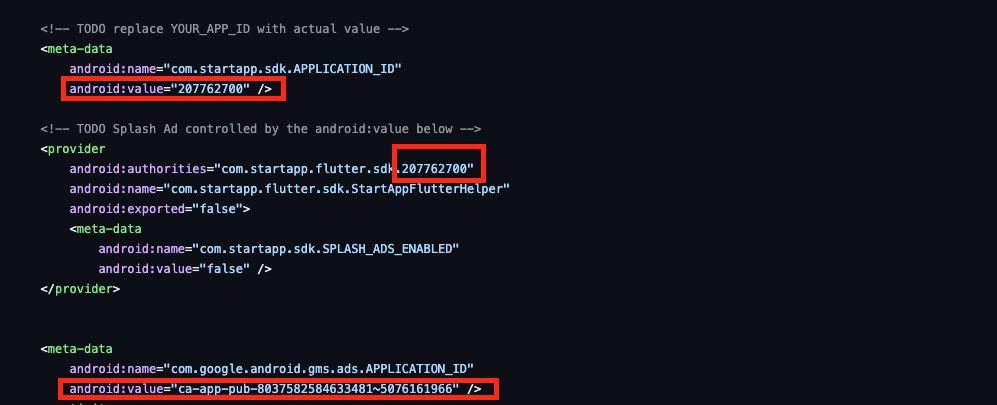
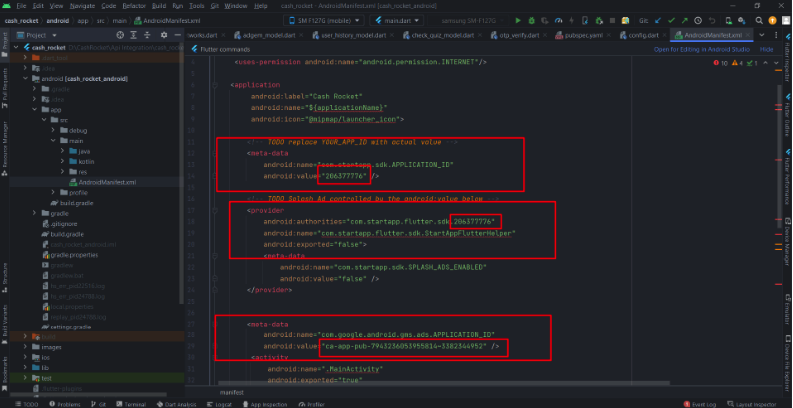
Add admob and startapp app id in AndroidManifest.xml. Go To android/app/src/main/AndroidManifest.xml and replace the selected ids with your ad ids.
Firebase Setup Tutorial
Add Firebase To your App.
- Go to https://console.firebase.google.com/
- Signin with your email
- Create a new project
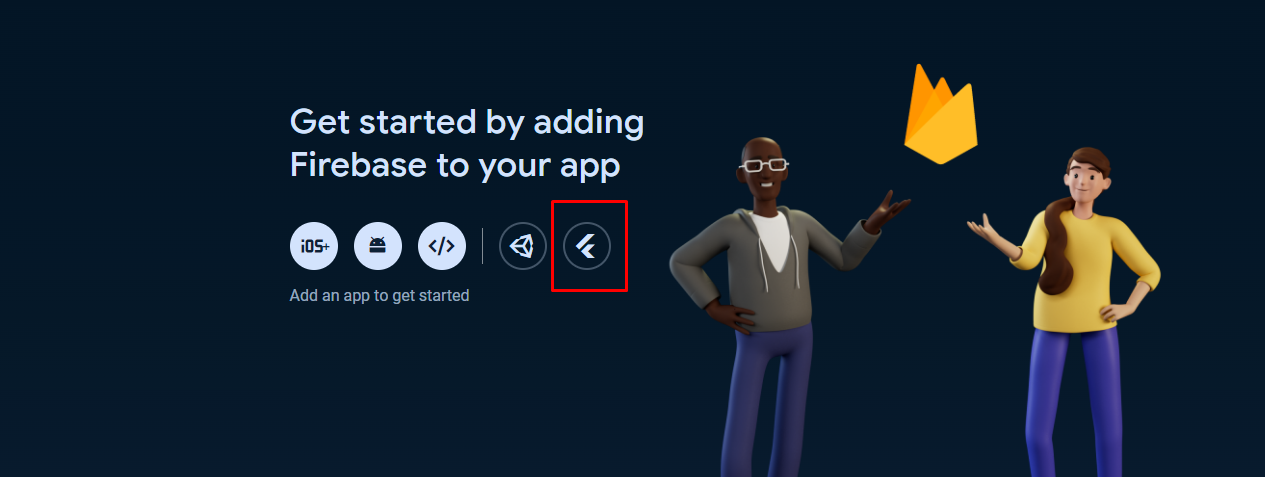
- After creating the project, Click on Add An App and select flutter
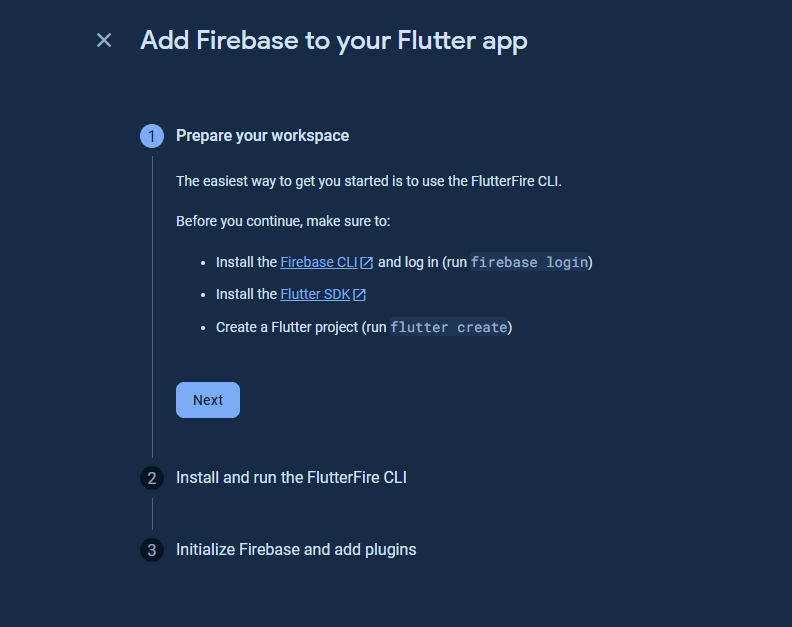
- Follow the on screen guidelines to add firebase to a flutter app
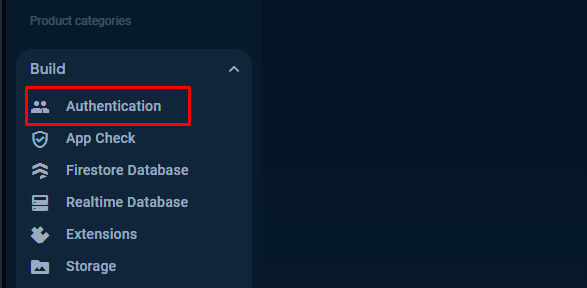
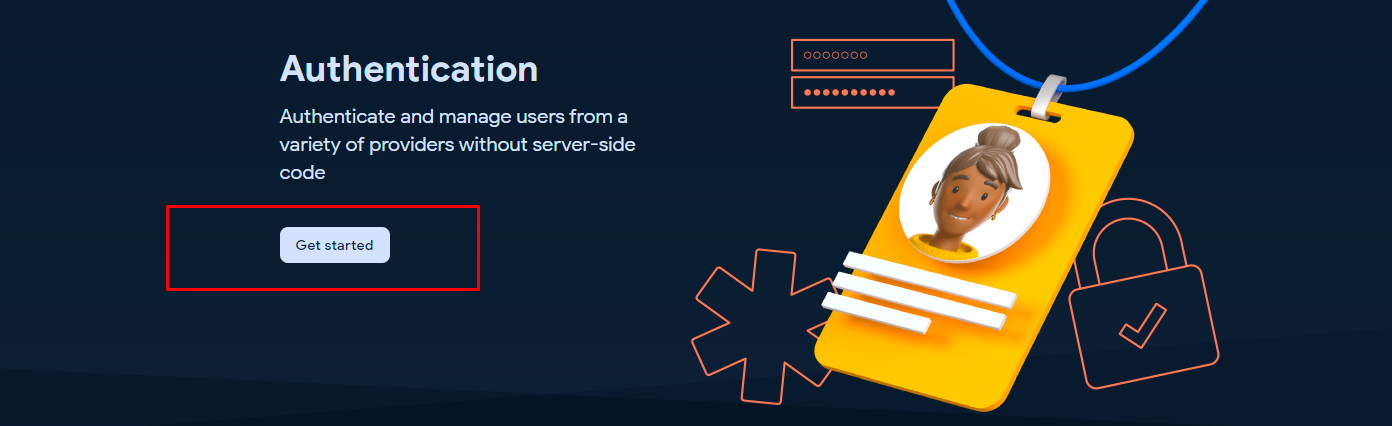
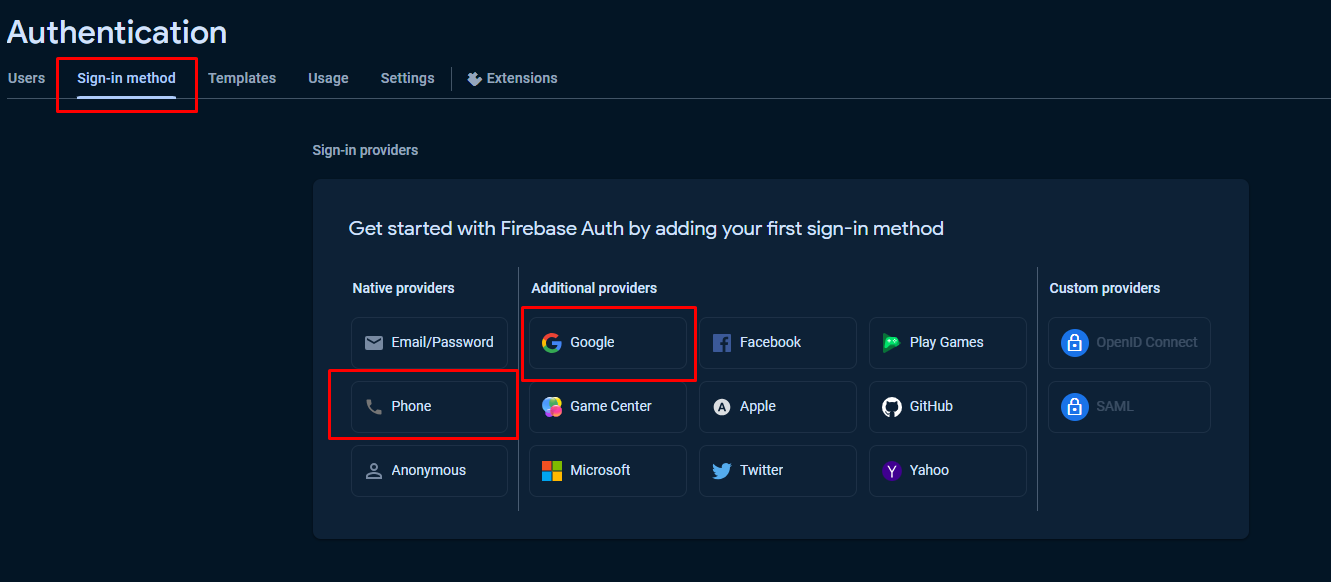
- Go To Authntication
- Click on Get Started
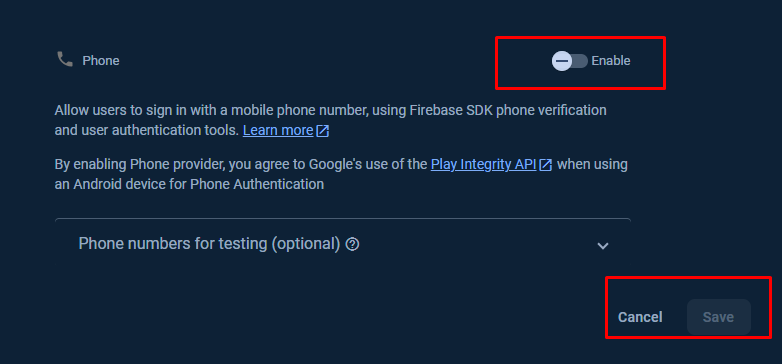
- Click on Google and Phone and enable it and click save
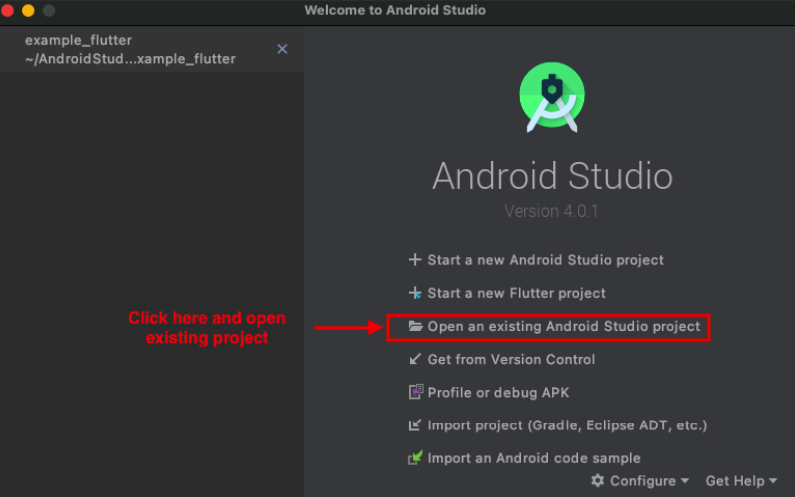
- Open terminal on android studio and go to android folder.
- Run .\gradlew signingReport and wait for the key generation
- After generating the key copy the sha1 key and add it to your firebase app.

Prerequisite
- Flutter & Dart SDK
- Anyone IDE Android Studio (Recommended), Visual Studio Code or IntelliJ IDEA
- To edit this project you must have Flutter and Dart installed and configured successfully on your computer.
- Set up your editor - Install the Flutter and Dart plugins.
- If you have got Android SDK installed and configured, to install Flutter you only need to:
- Download Flutter SDK from official website and extract it.
- Add path to previously extracted SDK to your PATH variable
- Run flutter doctor tool to check if everything is configured correctly.
- All above steps are mentioned here: https://flutter.dev/docs/get-started/install/
Android Studio – Windows
- Download Android Studio - https://developer.android.com/studio/
- Get the Flutter SDK - https://flutter.dev/docs/get-started/install
- Learn more about Android Studio - https://developer.android.com/studio/intro/
Step 1 : Get the Flutter SDK
- Download the following installation bundle to get the latest stable release of the Flutter SDK:
- Extract the zip file and place the contained flutter in the desired installation location for the Flutter SDK (for example, C:\src\flutter; do not install Flutter in a directory like C:\Program Files\ that requires elevated privileges)
Step 2 : Update your path
If you wish to run Flutter commands in the regular Windows console, take these steps to add Flutter to the PATH environment variable: From the Start search bar, enter ‘env’ and select Edit environment variables for your account. Under User variables check if there is an entry called Path:
- If the entry exists, append the full path to flutter\bin using ; as a separator from existing values.
- If the entry doesn’t exist, create a new user variable named Path with the full path to flutter\bin as its value
Important
Note that you have to close and reopen any existing console windows for these changes to take effect. You are now ready to run Flutter commands in the Flutter Console!
Step 3 : Run flutter doctor
From a console window that has the Flutter directory in the path (see above), run the following command to see if there are any platform dependencies you need to complete the setup:
Android Studio – macOS
- Download Android Studio - https://developer.android.com/studio/
- Download Xcode - https://apps.apple.com/us/app/xcode/id497799835?mt=12
- Get the Flutter SDK - https://flutter.dev/docs/get-started/install
- Learn more about Android Studio - https://developer.android.com/studio/intro/
Step 1 : Get the Flutter SDK
- Download the following installation bundle to get the latest stable release of the Flutter SDK:
- Download SDK and extract downloaded file, just double click on that. and just copy extracted folder and paste it to your desired location (for example, Documents\flutter).
Step 2 : Update your path
Important
Path variable needs to be updated to access “flutter” command from terminal. you can just update path variable for current terminal window only. and if you want to access flutter commands from anywhere in terminal, we need to update SDK path permanently.
To update PATH variable, we need to open terminal.
To update PATH variable for current terminal window only, then enter this command "export PATH="$PATH:`pwd`/flutter/bin"" and hit enter key.
To update PATH variable permanently, then Open or create .bash_profile file. to open or
create that file, then enter "sudo open -e $HOME/.bash_profile" and hit enter key.Append
below line to bash_profile file at bottom of all other content. "export PATH="$PATH:
[PATH_TO_FLUTTER_GIT_DIRECTORY]/flutter/bin"" as
[PATH_TO_FLUTTER_GIT_DIRECTORY] is actual path of SDK folder.
Run this command on terminal "source $HOME/.bash_profile" to refresh PATH variables.
Then check whether our SDK is successfully installed or not.
You are now ready to run Flutter commands in the Flutter Console!
Run "flutter doctor" into terminal, If you are getting check list of flutter sdk requirements, it means SDK is successfully installed on your machine. and you can start building flutter apps on your machine.
Android Studio – Linux
- Download Android Studio - https://developer.android.com/studio/
- Get the Flutter SDK - https://flutter.dev/docs/get-started/install/linux
- Learn more about Android Studio - https://developer.android.com/studio/intro/
Step 1 : Get the Flutter SDK
- Download the following installation bundle to get the latest stable release of the Flutter SDK:
- Download SDK and extract downloaded file, just double click on that. and just copy extracted folder and paste it to your desired location (for example, Documents\flutter).
Step 2 : Update your path
Important
Path variable needs to be updated to access “flutter” command from terminal. you can just update path variable for current terminal window only. and if you want to access flutter commands from anywhere in terminal, we need to update SDK path permanently.
You’ll probably want to update this variable permanently, so you can run flutter
commands in any terminal session. To update PATH variable, we need to open terminal.
- Run
source $HOME/.to refresh the current window, or open a new terminal window to automatically source the file. - Verify that the
flutter/bindirectory is now in your PATH by running:
GETTING STARTED (BUILD & RUN)
Important
All below steps are must be followed to build and run application
Download Project
Download and find the your project folder, use your preferred IDE (Android Studio / Visual Studio Code / IntelliJ IDEA) to run the project
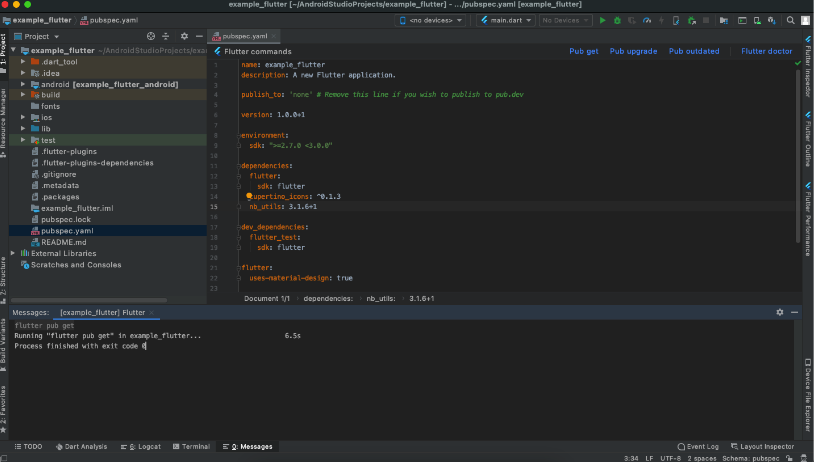
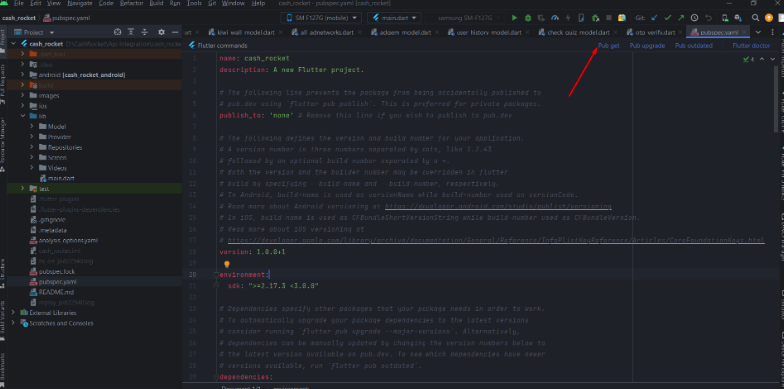
Get Dependencies
After you loaded project successfully, run the following command in the terminal to install
all the dependencies listed in the pubspec.yaml file in the project's root directory or just
click on Pub get in pubspec.yaml file if you don't want to use command.
Important
All below steps are must be followed to build and run application
Build and Run App
- Locate the main Android Studio toolbar.
- In the target selector, select an Android device for running the app. If none are listed as available, select Tools > Android > AVD Manager and create one there. For details, see Managing AVDs
- Click the run icon in the toolbar, or invoke the menu item Run > Run.
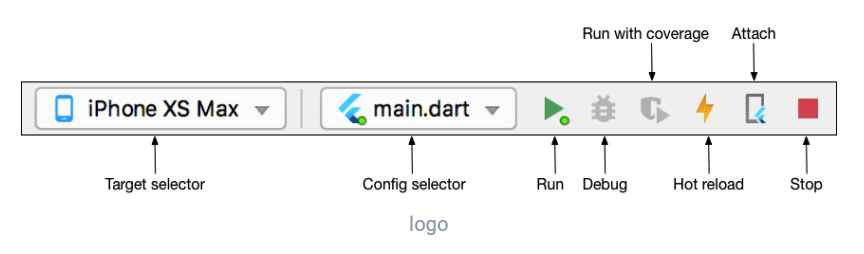
After the app build completes, you’ll see the app on your device.
If you don’t use Android Studio or IntelliJ you can use the command line to run your application using the following command
Important
Below step requires flutter path to be set in your Environment variables. See https://flutter.dev/docs/get-started/install/windows
You will see below like screen after you have build your app successfully.
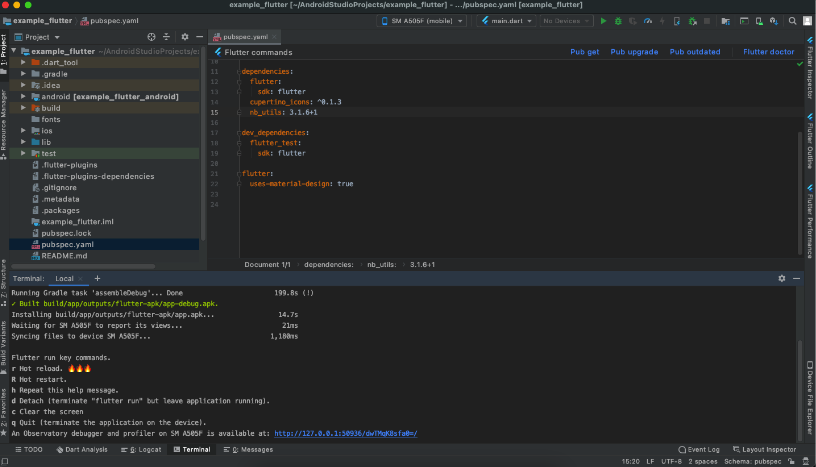
Try hot reload
Flutter offers a fast development cycle with Stateful Hot Reload, the ability to reload the code of a live running app without restarting or losing app state. Make a change to app source, tell your IDE or command-line tool that you want to hot reload, and see the change in your simulator, emulator, or device.
Important
Do not stop your app. let your app run.
PROJECT STRUCTURE & FEATURES
- images: apps/widgets/snippets images as well as appIcon are stored here.
- lib: Application main file and folder are located here.
- Screens: Full Apps UI Code can be found here.
- Components: Re-useable widget can be found here
- Constant: All constant value are located here
- Main: All the routes are been declared here.
- Pubspec.yaml: Application name and other project dependencies can be found here
Application Features
- Clean Code and a well structured project
- Single code base for both Android & iOS
- 60 FPS Support for both Android & iOS
- Fully responsive UI
- Best UI & UX
- Dark and light modes
- Great animation
- Easy to customize
- Free life time updates & stunning customer support
- Easy to integrate in your project
Mobile Application Setup:
Unzip the downloaded zip file from envato and check the mobile app folder. Unzip it and open android studio.Click open and select the unzipped folder inside mobile app folder from your downloaded zip.
Unzip the downloaded zip file from envato and check the mobile app folder. Unzip it and open android studio.Click open and select the unzipped folder inside mobile app folder from your downloaded zip.
Then go to lib > Screen > Constant Data > Config.dart and add your server url and site url.
Then go to android > app > src > main > androidmanifest.xml and change the marked ids with your startapp and admob id.
HELP & SUPPORT
Free support policy includes troubleshooting, technical assistance with the product only. It does not include any customization, additional features integration or concerns about third- party plugins compatibility. But, support is applied to plugin(s) we have developed and integrated ourselves. We appreciate your understanding!
If you need assistance and information on purchased product that is not covered in documentation, mail them on our support at
You can expect answer within 24-48 hours, usually as soon as possible in the order they were received.
Additionally, if any email has no response from the item owner for more than 7 days, that support email will be archived by default. However, if you need further assistance, you can mail us again.